Sunday, June 10, 2012

"Cafe Gourmand": what is it?

For few years now there has been a new concept for dessert in many french restaurants. It is called "Cafe Gourmand" which means something like "Gourmet Coffee". Each time I have the opportunity to eat in a french restaurant which has it on the menu, I order it when it's time for dessert!
But what is it exactly?
It is composed of a cup of coffee (espresso usually) and few mini desserts such as pie, tart, ice cream scoop, brownie, macaroon, dessert in a glass cup, .... everything is possible as long as at least 3 mini desserts are served with the cup of coffee.

Here are few pictures of the "Cafe Gourmand" I tried:


Saturday, May 5, 2012

Perfect chocolate chip cookies

Two weeks ago I got my weekly newsletter from the Guardian - Life and Style, and there was something that caught my attention: a recipe of  "perfect chocolate chip cookies". I had to try it, to see by myself if those were as good as they pretend to be! So for once, I carefully followed the recipe, thing I usually never do. And so here I share this recipe with you, because they are really worth the try! 


Ingredients


120g salted butter, at room temperature
75g light brown sugar
75g granulated sugar
½ tsp vanilla extract
1 egg
240g plain flour
½ tsp bicarbonate of soda
170g dark chocolate 
roughly chopped Sea salt flakes (optional)


Directions


1. Using a wooden spoon, or (even better) a food mixer, beat together the butter and sugars until just combined. Add the vanilla extract, then the egg, and beat in well.


2. Sift together the flour and bicarbonate of soda, then use a spoon to add to the mixture, stirring until it just comes together into a dough. Fold in the chocolate pieces, then chill overnight, or for up to 72 hours.


3. Preheat the oven to 180C. Line two baking trays with greaseproof paper, and divide the mixture into golf-ball sized rounds, spacing them well apart. Bake for about 15 minutes, until golden, but not browned.


4. Sprinkle lightly with sea salt if using, and allow to cool on the tray for a couple of minutes, before moving to a wire rack to cool completely – or scoffing immediately.


Source: the Guardian, Life and Style, 25.04.2012

Monday, April 23, 2012

Classic lasagna


Lasagna has been my favorite main dish like...forever. I can't remember at all when was the first time I ate it, or how many times I ate it. Too many times I guess. You know there is some foods, if you eat too them too many times, you just start at some point to not like it anymore...but not lasagna. It didn't happen. I still enjoy them so much when I eat them. And I also enjoy preparing them myself. The recipe I usually do is quite easy in my opinion, the only tricky thing in it might be the bechamel (white sauce). And well sometimes I end up making my Bolognese too liquid which gives the result you see on the picture on top: it doesn't look so pretty but at least the taste stays great. 

Ingredients

- 12 lasagna sheets
- 100g grated cheese

For the bolognese

- 4 tbsp olive oil
- 500g ground beef
- 2 onions
- 200g tomato sauce (best if it's the kind with crushed tomatoes inside)
- 2 tsp chopped parsley leaves 
- salt and pepper

For the bechamel

- 50cl milk
- 30g butter
- 40g flour
- salt and pepper
- 1 pinch grated nutmeg


Directions


Bolognese:

In a large casserole pot, heat oil over medium high heat. Add the onions cut in small pieces, and saute until soft and translucent. Add the ground beef and let it simmer until cooked. Add the tomato sauce, salt, pepper and the parsley. Mix well and let simmer at very low heat for about 20 minutes. 

Bechamel:

In a small kettle, melt the butter over low heat. Add the flour and whisk with a wooden spoon until smooth, about 5 minutes. Gradually add the milk. Whisk constantly to avoid lumps. Simmer and whisk over medium heat until the sauce is thick, about 10 minutes. The sauce should be thick enough to coat the back of wooden spoon. Remove from heat and add the nutmeg, salt and pepper. 

Let's put everything together:

Preheat the oven to 200 degrees celcius. 
In a gratin dish, put the different preparation and ingredients: lasagna sheets side by side(to cover the whole dish), bolognese (you should make sure that it covers properly all the lasagna sheets so that they get wet, that way they will easily cook in the oven, without any need to precook them), bechamel. Do that for as many times as you have bolognese, but keep some bechamel for the end. To finish the dish, put those ingredients in this order: lasagna sheets, the rest of bechamel, and the grated cheese. 
Put in the oven for about 20 minutes. 

Monday, April 16, 2012

Scottish shortbread - a very easy recipe


When I visited Scotland last year, I ate a lot of shorbread there. And since then I wanted to try to bake them by myself. It didn't happen until recently, when I got a new Jamie Oliver cookbook about Great Britain. The recipe for shortbread there was really easy and only few ingredients were needed; the kind of ingredients one only has at home! So it is the recipe which inspired this one. There is very few modification to what's in the book. It came out to be really good, but I know I can still improve from there. And I will try again! because I love Scottish shortbreads.

 Ingredients


- 200g flour
- 50g caster sugar; plus extra for sprinkling over
- 125g unsalted butter
- 1 tbsp vanilla extract

Directions


Preheat the oven to 170 degrees celcius.
 Mix the flour and sugar together. 

 Rub in the butter with your thumb and forefinger,

 then add the vanilla extract and squash, pat and push it into a dough.

 Form a ball and then roll it until it's 1cm thick (add a little bit of flour on top if it's sticky)

 Cut small finger shapes so that it looks like that. And put them on a baking sheet.

 Sprinkle over some sugar and put in the oven for 20 to 30 minutes.
It's ready when it has a lovely golden colour. 
Leave it to cool down before eating.

 It's perfect with a cup of tea!

And if you have some left, put them in an iron box. 

Friday, April 13, 2012

Brownie double choc cake


I've been recently on a diet for 6 months, and I lost 15 kilos (33 pounds). And as many know, a diet is full of sacrifices. So for the last few weeks I've been craving for brownies, a really chocolaty brownie! I even tried to make a diet version of them, but failed. It was good but didn't taste at all like a brownie. So here I am now, out of the strict part of my diet and able once per week to eat whatever I wish. So one of the first dessert I made was a brownie!! Unluckily, I didn't have a square tin anymore, so well, this did not stop me: I put the brownie in a round cake tin, and it ended up as what I called a brownie cake!!

Here is the recipe of the one I made:

Ingredients


- 340g of butter
- 40g cocoa powder
- 4 eggs
- 250g brown sugar
- 140g flour
- 2 tbsp vanilla extract
- 115g almonds, nuts mix (in powder)
- 115g dark chocolate
- 2 tbsp milk

(if in my next posts you wish me to also put the ingredients in pounds, please tell me)


Directions


  • Preheat the oven at 180 degrees celcius.
  • Melt 225g butter with 40g cocoa powder in a bain-marie. 
  • In a bowl, mix the eggs with the brown sugar, and add this mix to the butter-cocoa mix. Add the flour, vanilla extract and nuts-almonds. Mix everything well together.
  • Pour the dough in a 25cm cake tin. Put in the oven for 15-20 minutes.
  • Remove the cake from the tin and let it cool down.
  • In the meantime, melt the dark chocolate with the milk in a bain-marie. When smooth, take it away from the stove and add 115g of soft butter. Mix well until smooth.
  • When the icing is cold and a little bit thick, spread it on the brownie cake.


Monday, April 9, 2012

Fast and Easy Apple Tart


After few weeks without a post, this new one comes also with an entirely new design for the blog. I hope you like it! The title picture is entirely home-made, and I actually had a lot of fun doing it. So what happened during those weeks without me posting? Well, I went to Spain for 2 weeks with my uni for an intensive program in destination analysis (part of my hospitality management bachelor degree), and then I got sick and my computer had problems at the same time. But now I'm back on my feet and so is my computer! So for that new post, I'll share with you a fast and easy recipe of apple tart. I made that up once when I wanted some apple tart but didn't have much time to bake
everything from the scratch.


Ingredients:


- 1 ready-to-use shortcrust pastry
- 1 pack of cream or vanilla pudding (follow the instructions on the pack to prepare it. You'll just need to add milk and sugar)
- 4/5 apples

Directions:

Peel and cut the apples in quarters.
Put the ready-to-use in a pie dish, and put very small holes in it with a fork, so that the pastry doesn't rise when in the oven.
Put the apple quarters on the pastry.
Put in the oven: first during 15 minutes at 220 degrees celcius, then during 25 minutes at 200 degrees celcius.
Take the tart out of the oven and pour the pudding on the apple.
Let it cool down and put it in the fridge until the pudding has gotten thick (when it's cold or almost cold, it should be perfect). But of course if you can't wait, you can also eat it lukewarm, then the pudding will be still a little bit liquid, but it won't matter!


Thursday, March 15, 2012

Eating in Tallinn, Estonia, part 5: pizza night!

What to eat on a night out when it's already late and almost all restaurants are closed? Pizza of course! We were lucky that in a mall in the old city of Tallinn, the pizza place Vapiano was still open, so we went there. We never say no to pizzas, especially if it is in an italian restaurant. They tasted really good and according to the taste they were definitely made with fresh products and cooked in a wood stove. Here are the ones we ate that night, it can give you ideas for your own pizzas nights! And if you want to make the dough, I have already published a recipe on a previous post: Sweet and Sour Pizza

Pizza prosciutto e funghi (ham, mushrooms, tomato sauce, mozzarella)

Pizza diavolo (spicy Italian sausage, bell peppers, onions, tomato sauce, mozzarella)

Wednesday, March 14, 2012

Eating in Tallinn, Estonia, part 4: lunch in the old town

After touring around the city on a cold but sunny day, walking hours on wet and icy sidewalks, warm food in a nice place was needed! So just opposite the beautiful city hall building, in a small restaurant/wine cellar called Rae, we found warm couches to sit on and warm ourselves. It was also lunch time and after the whole morning going around the old town, we were of course hungry. So we ordered some food, and were really happy about what we got there!
Here is what I've had on that day:

As a starter I ordered garlic bread, and got surprised when it arrived! Usually when ordering garlic bread, I always get some kind of baguette, but this was definitely different: it was crispy, grilled garlic bread sticks served with a garlic sauce. This was absolutely delicious and I really want to try to cook those myself!

As a main dish, as I absolutely love goat cheese, I ordered goat cheese pasty! As you can see the goat cheese slice there is really a big one, and the nice thing was that this piece of goat cheese was covered with liquid honey. This combination tasted really good. And about the pastas, the sauce was really creamy, and the salad with cherry tomatoes there were a touch of freshness in the meal. All together this pasta dish was really good, and I will remember it next time I cook goat cheese pasta.

Tuesday, March 6, 2012

Eating in Tallinn, Estonia, part 3: Sacher Torte

As told in the previous post, Tallinn is full of small coffee places serving delicious sweet delicacies and awesome hot chocolates. Here is what I've tried when in one of those "oh so awesome" coffee places. I love chocolate, everything with chocolate, so I tried their Sacher Torte. But what is exactly Sacher Torte? Well it's a kind of chocolate cake: The cake consists of two layers of dense, not overly sweet chocolate cake (traditionally a sponge cake) with a thin layer of apricot jam in the middle and dark chocolate icing on the top and sides. It is traditionally served with whipped cream without any sugar in it, as most Viennese consider the Sachertorte too "dry" to be eaten on its own.(source of definition: wikipedia).
And this cake is so delicious, I especially loved the thick dark chocolate icing. At each bite, it was melting slowly in my mouth. So chocolaty!  So next goal in my baking adventure: mastering in Sacher Torte! And when I do so, I will share my recipe with you!


Saturday, March 3, 2012

Eating in Tallinn, Estonia, part 2: cacao vs hot chocolate

In Estonia, you will find many little coffee places everywhere, which is very nice when going there in the winter and you then need to reheat yourself with coffee, or better, with hot chocolate. But in Estonia for what in other countries we usually only call "hot chocolate", they have two different drinks: cacao and hot chocolate. Here they are: 

This one is the one called "cacao". It is the most common one, the one with cacao powder, milk, and cream (for the delicious foam on top). 

This second one is the one they call "hot chocolate". So first it was like a normal hot chocolate with whipped cream on top and chocolate chips: really refreshing in mouth! The big surprise came when after I ate the whipped cream. And it looked like that:
Instead of the usual cacao powder + milk, I discovered it was REAL hot chocolate! Melted dark chocolate to drink! Oh My God!! This was total heaven in my mouth! I've never drunk such a delicious hot chocolate! And I will definitely do that myself at home some time soon! 

Tuesday, February 28, 2012

Eating in Tallinn, Estonia, part 1: Cheesecake

I arrived in Estonia today and will stay there for 3 days. There was a snow storm all day long so the sightseeing was postponed and it was shopping day instead! So my dear and I went to Rocca al Mare shopping center, which is apparently the biggest one around here. And after 2h of intense shopping we were hungry. There was a food court there with restaurants from all around the world, but we had to choose one. So that s how we ended up at Mack BBQ restaurant. And they had cheesecake! So well... I had to order one! And I wasn't disappointed at all! First it looked really nice, and it smelled awesomely good! Then the taste was a little bit different from the New York style cheesecake. This one was tasting refreshing! It was delicious!

Sunday, February 26, 2012

Finland's Karelian pasties

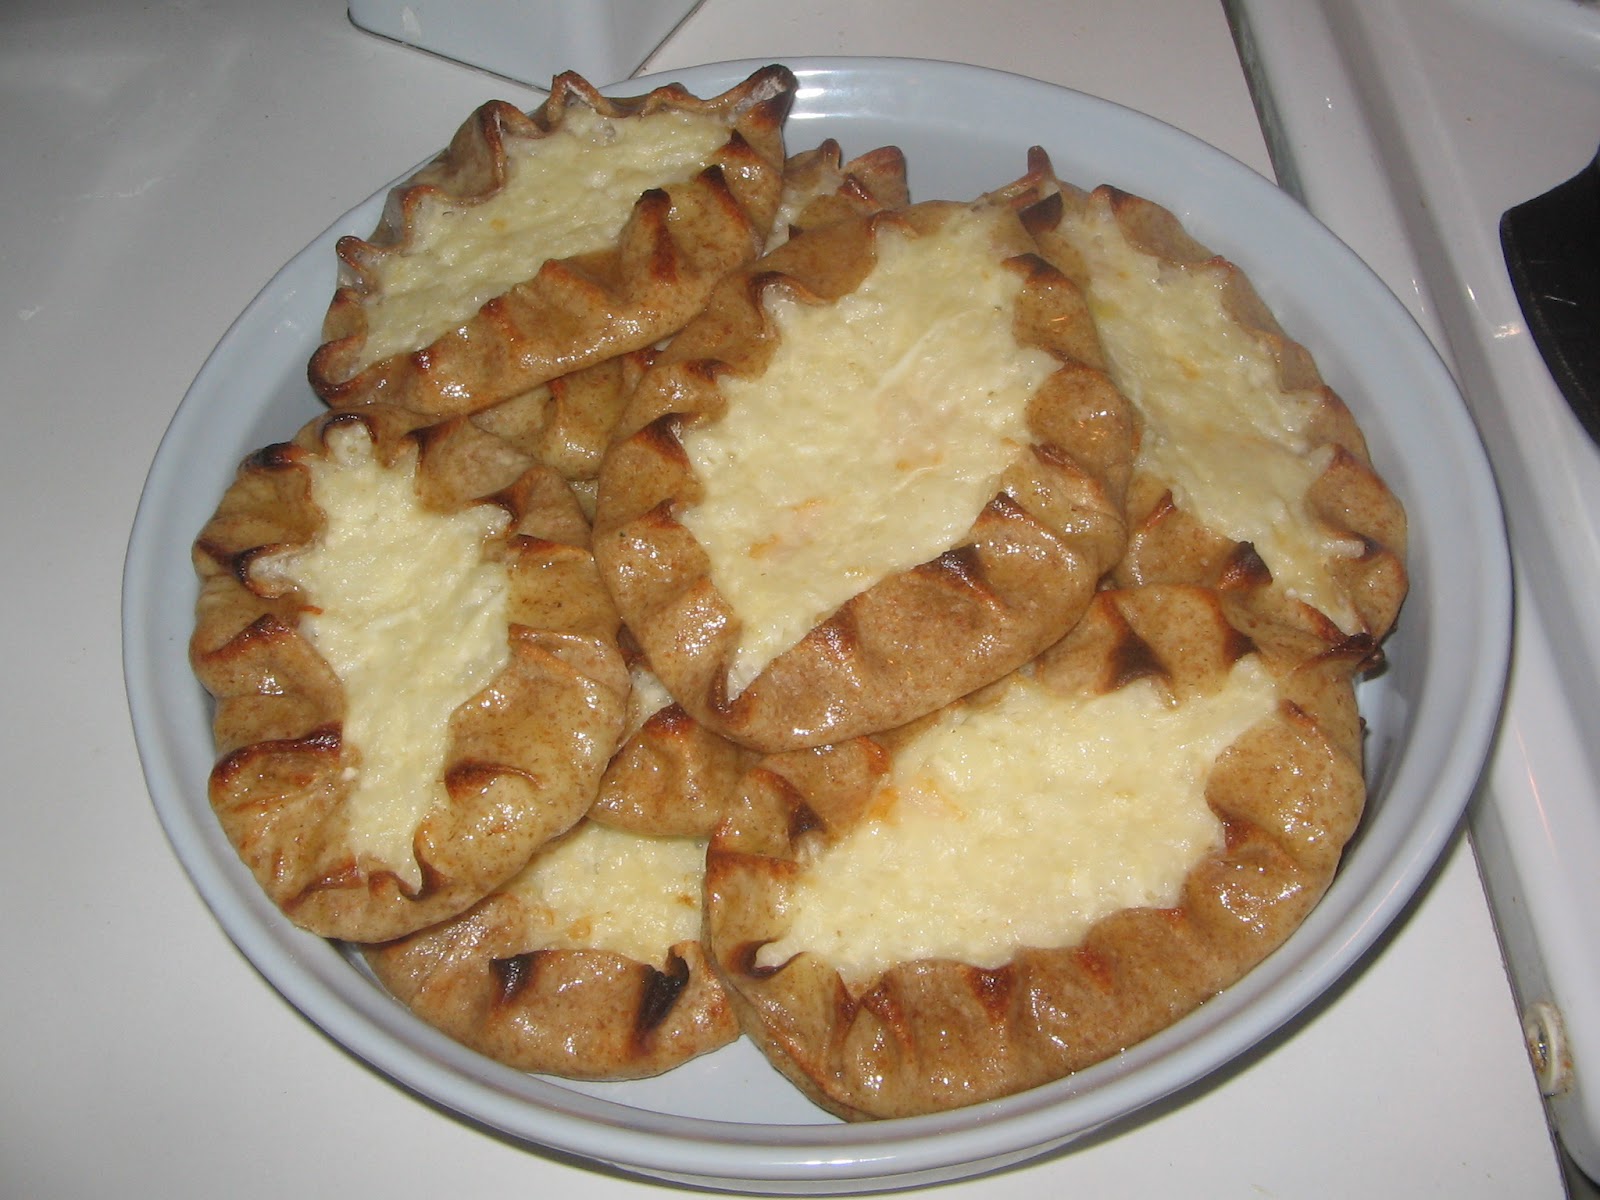
Living in Finland for 5 years now, I have learned to cook and bake some of their traditional dishes. And those little pasties are my favorite! Many people spread egg butter on them, but i prefer to just spread slightly salted butter. It's delicious. You can eat it with a soup or any meal, or as a replacement for bread (that's how i eat it), or just on its own.


Ingredients:


For the crust itself:

  • 25cl water
  • 1 tsp salt
  • 2 tbsp melted butter
  • 190g white flour
  • 190g rye flour
For the filling:

  • 50cl water
  • 30cl rice for porridge
  • 90cl milk
  • 1,5 tsp salt

For the basting sauce (just mix the ingredients together):
  • 12,5cl cup hot milk
  • 2 tbsp melted butter

Instructions for the crust itself:

Mix the water, salt, and melted butter in a large bowl and stir in the white flour.
Beat until smooth. 
Add the rye flour and mix until well blended. 
Put the dough on a floured board and knead for 3 minutes. 
Shape it into a roll about 6 cm in diameter and then divide into 12 equal portions. 
Dust with flour and pat each portion into a small round cake. 
Then roll out into a circle about 15 cm in diameter. 

Instructions for the filling (rice porridge):

Boil the water, then add the rice. 
Boil until the water has saturated the rice.
Add the milk and stir the filling for a few minutes. 
Reduce heat and let simmer for about 40 minutes.
Stir every now and then.
When it seems thickish, your porridge is ready.  
Then add the salt and put it aside to cool.

Instructions for making the pasties:

Preheat your oven to 230 degrees celcius.
To fill, place 3 or 4 tbsp of the rice porridge on each circle of dough and spread to within 2cm of the edge. 
Fold two sides of the dough onto the filling, forming an oval shape, but leave around 2cm wide strip of the filling exposed. 
Crimp the edges of the dough. 
Place the pasty on a greased baking sheet and put in the oven for 15 minutes or until lightly browned, basting twice during the baking with the milk and butter mixture. 
Baste once again when you take them out of the oven.  
You can eat them hot or cold, they are delicious both ways! 

Enjoy!


Saturday, February 25, 2012

Madeleines

Those cute little cake are traditional small cakes from my region, Lorraine, in France. They are sponge cakes with a distinctive shell-like shape acquired from being baked in pans with shell shaped depressions. It's a little cake that I love to eat with tea or hot chocolate.

Here you can see how the pans look:


Ingredients:


  • 125g butter, softened
  • 125g flour
  • 125g vanilla sugar
  • 4 eggs
  • 1 tsp baking powder 

Instructions:

Preheat your oven at 180 degree celcius.
Mix the sugar and butter until frothy.
Add the eggs one by one. Mix well.
Then add the flour and the baking powder. Mix well until smooth.

Pour in the pans and put in the oven for 20 minutes. 

Enjoy!


Friday, February 24, 2012

Devil's chocolate muffins


If you love chocolate, this recipe is definitely for you! I wanted to put as much chocolate as you can in a muffin, and here is the result of this food experiment! I would say that it's heaven in a muffin!

Ingredients for 6 big muffins:

  • 115g cake flour
  • 1 tsp baking powder
  • 115g cane sugar
  • 115g butter, softened
  • 1 egg yolk
  • 1 egg white
  • 50g cooking chocolate
  • 1 tsp vanilla extract
  • 6cl milk
  • 100g chocolate chips

Instructions:

Preheat your oven at 175 degrees celcius.

Mix the sugar with the softened butter until smooth.

Add the egg yolk, the melted chocolate and the vanilla extract. Mix well.

Add the milk little by little, alternating with the flour (mix well each time). Add the baking powder. Mix well. 

Beat the egg white, and then add it slowly to the former mix.

Then add the chocolate chips and mix well. 

Pour in muffin tins and put in the oven for 25/30 minutes. 


Enjoy!!

LinkWithin

Related Posts Plugin for WordPress, Blogger...